Express is a popular minimalist web framework for Node.js. It lets you build web applications quickly and easily, and has fairly complete documentation you can check out here.
In this tutorial, I’ll show you how to build your first Express server in TypeScript.
Step 1: Setting up the development environment
Make sure you have Node.js and npm installed on your machine. To install these, you can follow the steps on their official sites.
Next, go to the location where you want to save your project and create a folder with whatever name you prefer. In my case I’ll use ts-server.
mkdir ts-server
cd ts-server
To start the node project with default settings, use the following command.
npm init -y
To start a git repository, use the following command.
git init
Next, create a .gitignore file at the root of the directory. This file is used to ignore certain directories or files that don’t need to be pushed to the remote repository.
To create the .gitignore, you can go to the following link, where for this case you can add the following restrictions.
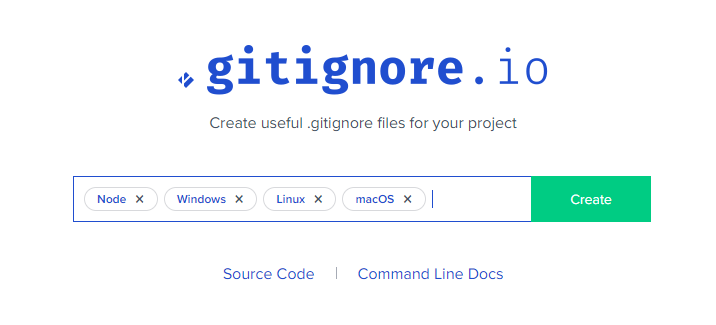
This will generate the content you need for the .gitignore, so copy and paste it into the file you created.
Next, add an .editorconfig file at the root of the directory. Its goal is to have a standard for whatever editor you use, so if other developers want to contribute to the project, this configuration is already centralized.
root = true

[*]
charset = utf-8
indent_style = space
indent_size = 2
insert_final_newline = true
trim_trailing_whitespace = true

[*.js]
quote_type = single

[*.md]
max_line_length = off
trim_trailing_whitespace = false
It’s also necessary to configure a linter to follow a code standard, so create an .eslintrc.json file at the root of the directory with a configuration similar to this one.
{
  "parser": "@typescript-eslint/parser",
  "parserOptions": {
    "ecmaVersion": 2018,
    "sourceType": "module"
  },
  "extends": [
    "eslint:recommended",
    "plugin:@typescript-eslint/recommended",
    "prettier"
  ],
  "env": {
    "es6": true,
    "node": true,
    "jest": true
  },
  "plugins": ["@typescript-eslint"],
  "rules": {
    "no-console": "warn"
  }
}
With this, you have the main configuration for your project.
Step 2: Installing dependencies
To continue with the project, we need to install the dependencies our project requires.
These are the dependencies needed in a development environment, meaning they aren’t required when the server is in production.
- @types/express —> Provides type definitions for the Express framework.
- @typescript-eslint/eslint-plugin —> An ESLint plugin containing a set of rules specific to TypeScript.
- @typescript-eslint/parser —> A parser that lets ESLint understand TypeScript. It’s required so ESLint can parse and apply rules to TypeScript files.
- eslint —> A static code analysis tool for spotting problematic patterns in JavaScript code.
- eslint-config-prettier —> Disables ESLint rules that are unnecessary.
- eslint-plugin-prettier —> Integrates Prettier with ESLint, letting Prettier format code as part of the linting process.
- nodemon —> A tool that helps develop Node.js-based applications by automatically restarting the app when it detects file changes in the directory.
- prettier —> A code formatter that ensures all code has a consistent style.
- ts-node —> Lets you run TypeScript files directly in Node.js without compiling them to JavaScript first.
- typescript —> A superset of JavaScript that adds optional static types.
The dependency needed for production, in this case.
- express —> Minimalist web framework
To install these dependencies, we’ll use the following commands.
npm i express
npm i @types/express @typescript-eslint/eslint-plugin @typescript-eslint/parser eslint eslint-config-prettier eslint-plugin-prettier nodemon prettier ts-node typescript -D
Step 3: Configuration files
- To create the TypeScript configuration file you can use the following command.
npx tsc --init
and it should contain something like this.
{
  "compilerOptions": {
    "target": "es6",
    "module": "commonjs",
    "strict": true,
    "esModuleInterop": true,
    "skipLibCheck": true,
    "forceConsistentCasingInFileNames": true,
    "outDir": "./dist",
    "rootDir": "./src"
  },
  "include": ["src/**/*"],
  "exclude": ["node_modules", "dist", "src/tests/**/*"]
}
- You need to modify package.json so it uses nodemon and similar things, so it ends up looking something like this.
{
  "name": "curso-platzi",
  "version": "1.0.0",
  "description": "",
  "main": "index.js",
  "nodemonConfig": {
    "watch": [
      "src"
    ],
    "ext": "ts",
    "ignore": [
      "*.test.ts"
    ],
    "execMap": {
      "ts": "ts-node"
    }
  },
  "scripts": {
    "dev": "nodemon src/index.ts",
    "start": "node dist/index.js",
    "lint": "eslint src --ext .ts"
  },
  "keywords": [],
  "author": "",
  "license": "ISC",
  "devDependencies": {
    "@types/express": "^5.0.0",
    "@typescript-eslint/eslint-plugin": "^8.8.0",
    "@typescript-eslint/parser": "^8.8.0",
    "eslint": "^9.12.0",
    "eslint-config-prettier": "^9.1.0",
    "eslint-plugin-prettier": "^5.2.1",
    "nodemon": "^3.1.7",
    "prettier": "^3.3.3",
    "ts-node": "^10.9.2",
    "typescript": "^5.6.2"
  },
  "dependencies": {
    "express": "^4.21.0"
  }
}
Step 4: Starting the server
Finally, in the src/ directory add the index.ts file, where we can start up the server we need like this.
import express, { NextFunction, Request, Response } from "express";
// Set up what the server needs
const app = express();
const port = 3000;
// Define a middleware so requests and responses can be handled as JSON
app.use(express.json());
// Define the root endpoint, to get a resource
app.get("/", (req: Request, res: Response) => {
  res.send({ message: "Hello World" });
});

// Error handling
app.use((err: Error, req: Request, res: Response, next: NextFunction) => {
  res.status(500).send("Something went wrong");
});

// Start the server and listen on port 3000
app.listen(port, () => {
  console.log(`Server is running on port ${port}`);
});
The code structure ends up looking like this.
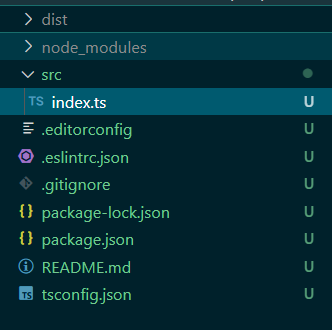
Conclusion
And that’s it, folks. I hope this was a good starting point for learning how to build web servers with Express, TypeScript, and Node.
Bye!